In this tutorial I am going to show you how to make a simple nodejs application that can store your Purchase History. Just a simple JavaScript app that lets you add and delete items from a database — you can easily alter it and make our simple nodejs app a todo list if you prefer. As you know databases are really important in any application if you wish to store/save information. For this application, we will be using NodeJS, Express, MongoDB and Bootstrap. The main purpose of this tutorial is to show you how to use the various Node modules (mainly Express) to create a simple nodejs application. To create the app you will need to have:
- NPM (Node Package Manager) and Node installed
- Some command prompt/terminal experience to issue commands
- Have a basic understanding of Javascript & HTML markup
- Have a free modulus.io account
Our completed app should look like the following:
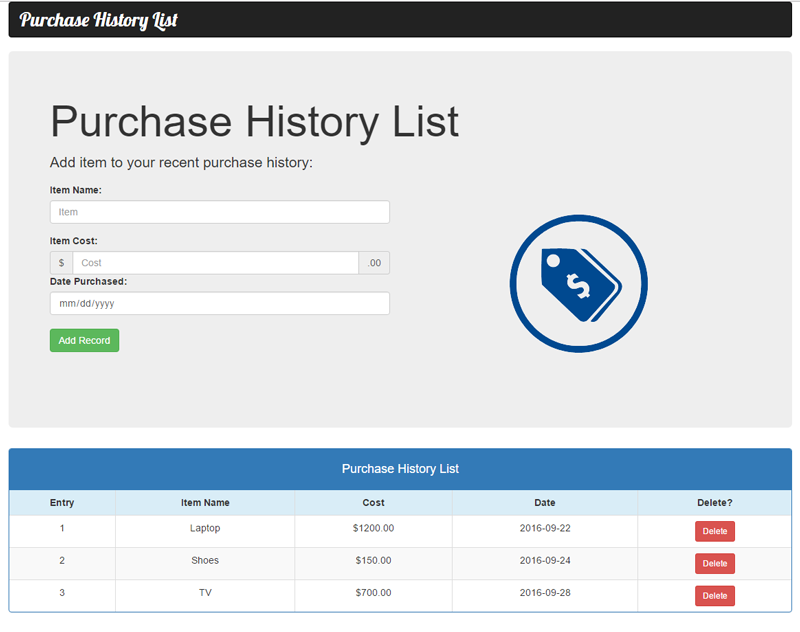
I have also provided a link to the GIT repository if you wish to clone the project and play around with the code.
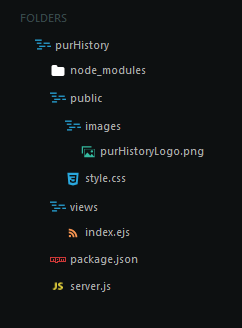
To get started, setup a folder/file structure similar to the following (besides the node_modules directory and the package.json file. Those will be automatically generated when we run commands later):
Next, open Windows command prompt or Linux terminal and CD into the directory purHistory. This will be our “root” project working directory. From that directory type:
npm init
This will initialize our Node project in the current working directory. It will then ask a series of questions, the only one that is really important is the project name. It might tell you that you cannot have caps, so just give the project the name “purhistory”. No other information is required and you can keep hitting enter until it returns you back to the original command prompt.
If you look in your project folder, you should now have a package.json file in your purHistory directory. This file holds the package dependencies that you will need for your project. This file also stores metadata such as project name, authors, license information, description, etc. If you open it, you will notice that all data in this file is saved in JSON format.
JavaScript Object Notation (JSON) is a lightweight, text-based, language-independent data interchange format. It was derived from the ECMAScript Programming Language Standard. JSON defines a small set of formatting rules for the portable representation of structured data. —filext.com
Next, we need to install Express. According to their website:
Express is a minimal and flexible Node.js web application framework that provides a robust set of features for web and mobile applications. — expressjs.com
.
Express is basically a Node.JS framework that lets us use JavaScript, outside the browser (server-side), to create web/network applications. It makes programming a Node.JS server somewhat less of a headache and handles URL requests and responses.
Info: When working with Node, the application that you write is the web server, in JavaScript. This is different than other languages in that it gives us full control over our web application/webpage.
To install Express, run the following command from the prompt/terminal:
npm install express --save
Info: The --save flag adds the repository requested from NPM to your package.json file.
Now you should have a node_modules directory with all modules/dependencies needed for us to be able to use Express in our project. If you go back and open the package.json file in the root project directory (purHistory), you will notice that it now has Express and its version listed.
The public directory will hold all the static files that we wish to serve to the client. These static files include images, css, javascript, etc. Files that will remain the same. In our case, this includes the CSS and PNG file that we will serve to the client. Here is a copy of the logo for our web application:

Right-click and save to your images directory
The views directory will hold our HTML/EJS files. This will hold all the views/html files that we will serve to the client. The difference between the view directory and the public is that the view that we serve to the client can change on the fly, whereas a static resource (file inside the public directory) stays the same. Essentially a view is what gets delivered to the client. A view can consist of both static and dynamic resources.
Although Express prefers that we use Jade as a “view engine”, we will be using .ejs file format instead. I prefer not to use Jade because I like to be able to use HTML markup and EJS allows us to do just that when structuring our website.
EJS is a simple templating language that lets you generate HTML markup with plain JavaScript. — http://ejs.co/
To install EJS, we simply run the following from the root directory:
npm install ejs --save
This will also add it to our package.json file, and add the necessary modules/dependencies to the node_modules directory.
The server.js file will hold the code for our actual Express server.
MongoDB setup
We also want to be able to preform CRUD (Create, Read, Update, Delete) operations on our simple nodejs application, and we need to be able to save the information even after we close the app. This is where MongoDB comes in. It will hold all our data in JSON format, and we can pass it back and forth from our application to the Database (DB). To do this, you can create a free account at modulus.io and use their MongoDB to hold our data.
We also have to include MongoDB in our project dependencies as well as body-parser, an Express middleware to handle the form data.
From the root directory, run:
npm install mongodb  --save
npm install body-parser --save
Body-parser will allow us to use the req.body, which will hold all the data the client submits via the POST request. By default, it is undefined, and is populated when you use the body-parsing middleware. The body-parsing middleware we will use is named “body-parser”.
Coding our Express Server
Open your purHistory/server.js file and add the following code to the top:
var express = require('express');  //require is node function to import modules
var app = express();  //instance of express
var MongoClient = require('mongodb');  //mongodb
var bodyParser = require('body-parser');  //body-parser middleware
Next we need to link in our database. If you haven’t already, create an account at modulus.io. Once you have your account, click “create database”.
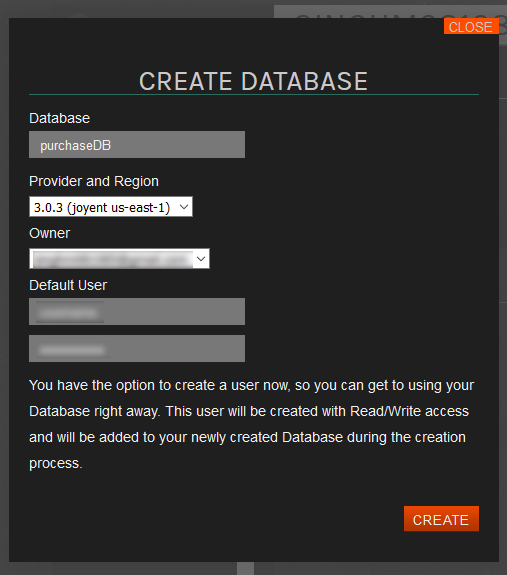
Give your database a name. I used the name “purchaseDB”.
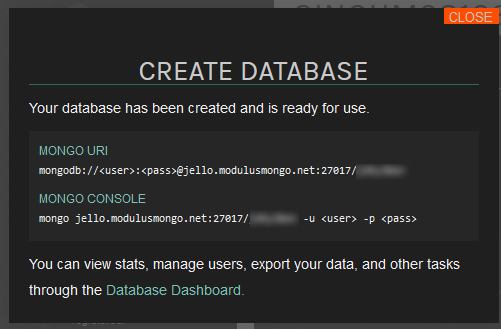
Afterwards you should be presented with the bit of code we will use to connect to our DB. Please remember the username and password you created and copy the first line and paste it as shown below.
Now, in our server.js file, add a connection to the database as follows:
//connect to mongodb.  Remmember to replace the connection string below with your own string
MongoClient.connect('mongodb://:@jello.modulusmongo.net:27017/xxxxxxxx', (err, database) => {
	if(err) return console.log(err)  //if error return error
		db=database

	app.listen(3000, function(){  // otherwise start server on port 3000
		console.log('listening on port 3000')
	})

})
This connects our Express server to our MongoDB and starts our server only if there is no error thrown. If there is an error thrown (ie our server cannot connect to database) it will let us know in our console. You can now test your database connection. Save the server.js file and from the console run:
node server
If all went well, the console should read:
listening on port 3000
You can now navigate to http://localhost:3000 with your browser but you will not see anything. This is because we haven’t created any content to serve to the client.
We now have a connection to our database but don’t have any data to serve to the client. Before we can do that, we have to set our “view engine” to EJS and setup our body-parser “middleware” to handle our data, as well as setup our “routes”.
Middleware essentially extends Express’s functionality and allows it to handle HTTP requests/responses. In our case, it will allow us to send data back and forth from the client to the database and populate the view that gets served back to the client dynamically.
Once again, open the server.js file and add the following lines of code:
//set Express to use EJS view engine instead of the default jade
app.set('view engine', 'ejs')
//add body-parser express middleware
app.use(bodyParser.urlencode({extended: true}))
app.use(bodyParser.json())
//define our public directory to serve our static resources
app.use(express.static(__dirname + 'public'))
Info: __dirname is the path to our current project directory.
Now it’s time to define our Routes. A route is how our server serves the content the client asks for. The client asks for content via the web browsers URL/query-strings and based on the URL the server can determine what data to send to the client through a view.
<span class="hljs-comment">
//define routes
app.get('/', (req, res) => {
	db.collection('purchaseDB').find().toArray(function(err, result){
		if (err) return console.log(err)
		//else render ejs
		res.render('index.ejs', {purchaseDB :result})
	})
})
Additional Info:
res.render is an Express method to send “views” from our server to the client.
Let’s stop with the server.js file for a moment and work with the actual file we are going to serve, index.ejs. Open the file named index.ejs, currently located in views folder. This file will contain our HTML and JS code. Also, we will be using Bootstrap to style our webpage/app.
Coding the Simple NodeJS Application Frontend
![]()
Bootstrap is the most popular HTML, CSS, and JS framework for developing responsive, mobile first projects on the web. —getbootstrap.com
To include Bootstrap, we will simply be linking in the CSS sheet from an online CDN (Content Delivery Network). All we are going to use it for is to quickly style our website.
We will also use a Google font to stylize our pages header title. The font I used is called “lobster” and available for free from https://fonts.google.com, however feel free to use whatever font you wish to use. In order to include the font, we simply link it in the head section of our index.ejs file, just as we do with Bootstrap.
In the index.ejs file, add the following code:
<!DOCTYPE html>
<html>
<head>
	<title>Purchase History</title>
	<link rel="stylesheet" href="https://maxcdn.bootstrapcdn.com/bootstrap/3.3.6/css/bootstrap.min.css">
	<link rel="stylesheet" href="style.css">
	<link href="https://fonts.googleapis.com/css?family=Lobster" rel="stylesheet">
</head>
<body>

<div class="container">

	<nav class="navbar navbar-inverse">
      <div class="navbar-header">
          <a class="navbar-brand" href="#">Purchase History List</a>
      </div>

	</nav>

	<div class="jumbotron">
  		<h1>Purchase History List</h1>
  		<p>Add item to your recent purchase history:</p>
  		<div class="row">
  		<div class="col-sm-6">
  		<form action="/add" method="POST" name="purchaseform">
            <div class="form-group">
              <label for="inputName">Item Name:</label>
              <input type="text" placeholder="Item" class="form-control" name="item">
            </div>

            <div>
              <label for="inputCost">Item Cost:</label>
              <div class="input-group">
                <div class="input-group-addon">$</div>
                <input type="number" class="form-control" id="inputCost" name="cost" placeholder="Cost">
                <div class="input-group-addon">.00</div>
              </div>
            </div>

            <div>
               <label for="inputCost">Date Purchased:</label>
               <input type="date" name="date" placeholder="Date" class="form-control">
            </div>

            <div>
            <button type="submit" class="btn btn-success">Add Record</button>
            </div>
   		</form>
   		</div>
   		<div class="col-sm-6 text-center">
   			<img src="images/purHistoryLogo.png">
   		</div>
   		</div>
  	</div>

    		<div class="panel panel-primary">
   			<div class="panel-heading text-center"><h4>Purchase History List</h4></div>
  			<table class="table table-striped table-hover table-bordered">
  				<tr class="info">
    				<th>Entry</th>
  					<th>Item Name</th>
  					<th>Cost</th>
  					<th>Date</th>
  					<th>Delete?</th>
  				</tr>
                                <%# Here is the benefit of EJS over HTML.  We cycle through the data in our DB and display and delete results dynamically %>
  				<% for(var i=0; i<purchaseDB.length; i++) { %>
  				<tr>
    				<td><%= (i + 1 )%></td>
  					<td><%= purchaseDB[i].item %></td>
  					<td>$<%= purchaseDB[i].cost %>.00</td>
  					<td><%= purchaseDB[i].date %></td>
  					<td><a href="/destroy/<%= purchaseDB[i]._id %>" class="btn btn-danger btn-sm" title="Delete">Delete</a></td>
  				</tr>
  				<% } %>
  			</table>
  		</div>

</div>
</body>
</html>
As you can see, for the most part, our .ejs file has HTML markup, however the table has code similar to JavaScript and allows us to retrieve the database data and format it to be displayed in a table at the bottom of the webpage. The view will dynamically update as the user enters and deletes data from our webpage. This is the benefit of using .ejs versus .html view engine. It allows us to update the view in real time. However, if you run your node server now, it still will not do much. We still have to handle the POST (submit) and GET (delete) requests to be able to read and write from our modulus.io MongoDB.
Update Express Server to handle Post & Delete
Open up the server.js file and add the following code:
//handle post request
app.post('/add', (req,res) => {
	db.collection('purchaseDB').save(req.body, (err, result) => {
		if (err) return console.log(err) //if error display in console
			console.log(req.body) //contains data user submits
			console.log('New entry saved to DB')
			res.redirect('/')  //redirect to original route
	})
})

//handle delete based on DB id
app.get( '/destroy/:id', (req, res) => {

	db.collection('purchaseDB', function(err, collection) {
		if(err) return console.log(err)  //if error display in console
			//else remove from DB
                       collection.remove({_id: new MongoClient.ObjectID(req.params.id)});
                       res.redirect('/')  //redirect to original route
});


})
Additional Info:
Since the client typically uses the URL path & querystring to communicate with the server, they are used by our application to determine how to respond to the client. GET is used to send information from our server and POST is used to send data from the end user to the Server.
To handle/parse HTTP form data (sent via POST request) we have to be able to use the Express req.body object, which can be added in using body-parser Express middleware. Data sent in the body of the POST request needs to be parsed and submitted to our database.
The request and response objects (can technically be named anything) are Node objects but are “extended” by Express. The request object starts as http.IncomingMessage, and the response object starts as http.ServerResponse, which are both Node objects. Express gives the original Node objects more functionality by providing us extra methods and properties, making it easier to code our server.
Stylize with our own custom CSS
Finally, lets quickly update the static style.css file located in our public directory to take care of some finishing styling:
/*change font of header title */
nav a{
	font-family: 'Lobster', cursive;
	font-size: 2em !important;
	color: white !important;
}

/* center table header */
table th{
	text-align: center;
}

/*center table rows */
table td {
	text-align: center;
}
As you can see, we didn’t have to do much formatting. Our Bootstrap stylesheet did most of the heavy lifting for us.
You can now go back to the command line or terminal and enter node server and then launch your browser (google chrome preferred) and navigate to http://localhost:3000. If all went well, you should be presented with our final application and be able to Add Items and Delete Items from the interface. As you can see, when you add an item, it will dynamically update the data that is displayed.
If you look at your console, you can see the data the user sends via the POST request:
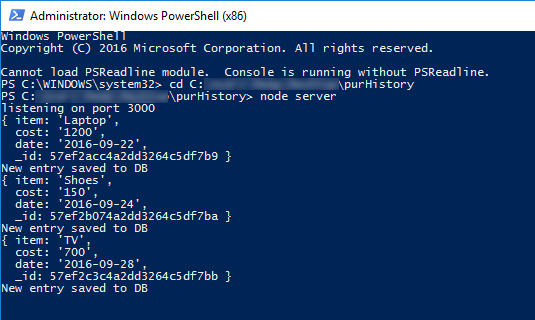
GIT Repository
As stated earlier, I have added the code files to Github. The files are available at https://github.com/TechSideOnline/purHistory.git.
If you have Git installed, you can clone the repo by running:
git clone https://github.com/TechSideOnline/purHistory.git
After cloning the repo, run the npm init command to generate the node_modules directory and download the dependencies.
You can then launch the server and navigate to http://localhost:3000 to test the application.
Summary
The simple NodeJS application is complete. As you can see, it’s a basic Javascript application that lets you add and remove data from a database. It then presents the data in a visually appealing frontend that was built using HTML/EJS.
In conclusion, Node allows us the program an application quickly via the its vast ecosystem of frameworks/modules and gives us full control of HTTP request and response objects. Express extends it’s functionality with middleware and makes coding less of a headache. Building a functional website/application today requires multiple technologies and Node allows us to use different “stacks” to achieve that goal. In this case we used Node Express and MongoDB as our “stack”.
Bootstrap was used just to quickly style our website/web-application. It also allows us to modularize our code better, which in turn provides greater scalability. There are other ways to code and modularize content even more using other templating languages such as mustache, but I will leave that up to you. Feel free to play around with the code.
0 Comments